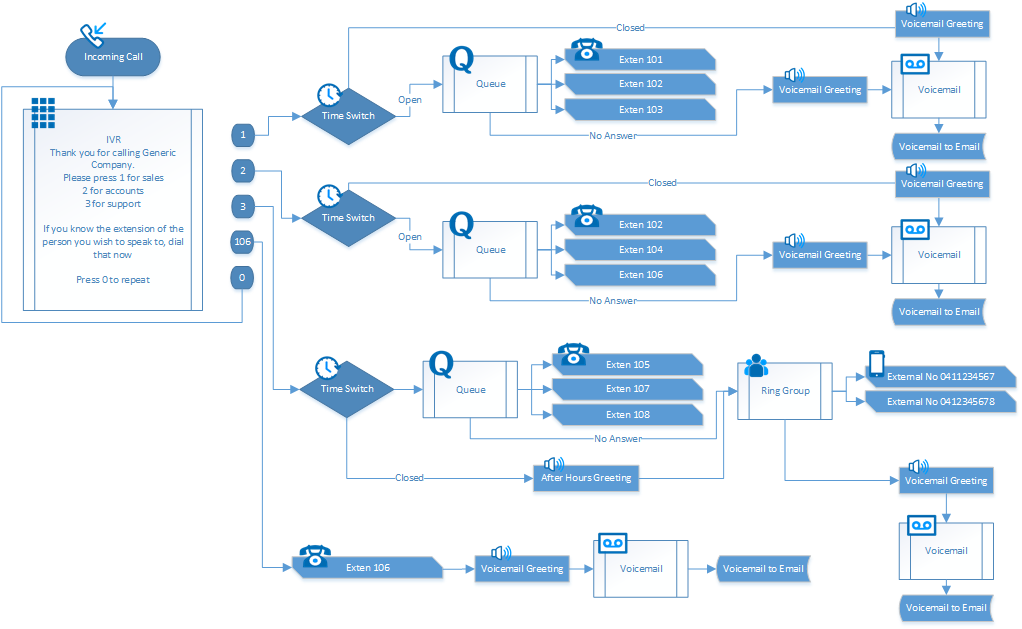
Complex PBX Setup Example, IVR with After Hours
This example will take inbound calls from a number and pass the caller to an IVR (also known as an Auto Attendant) with options for Sales, Accounts and Support.
For the Sales and Accounts queues, it will check if the business is open and, if it is, send callers to a queue, if not it will direct them to voicemail.
On the support option, it will check if the business is open and, if so, send the callers to a queue. If there is no answer, it will then ring mobile numbers. If the business is closed, the caller will be played an after hours message, then directed to the mobile numbers. If there is no answer, the call will be returned to a voice mailbox on the PBX.
Additionally, extension numbers can be dialed directly from the IVR menu.
To begin setting up the above, create your extensions.
On the left hand side, choose Number Routing. If you already have a number you wish to use for your main number, for example if you've ported a number in, please click 'Edit' corresponding to this number. Otherwise, please select Add a Number and select your location.
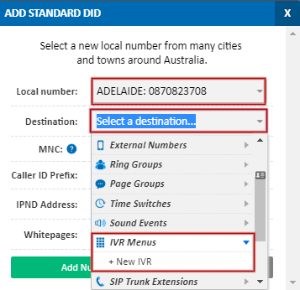
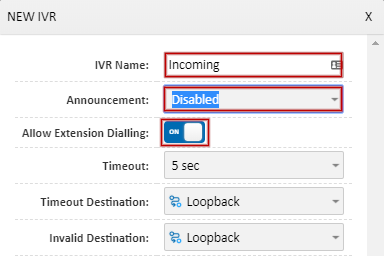
In the Destination field, select IVR Menus, then New IVR. Provide a name for your IVR (eg. "Incoming"), then enable the Allow Extension Dialling option if callers should have the option of directly dialing a staff member's extension number. From the Greeting field, select an existing sound file on the PBX (if applicable), New Sound (Upload) to upload a greeting file from your computer, or New Sound (Record) to record an announcement from an existing extension. As this field specifies the audio file with the options (eg. Press 1 for sales), we do not recommend routing to this IVR without an announcement in place (Announcement: Disabled).
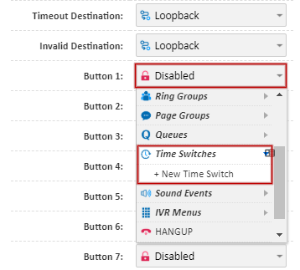
IVR Button Setup
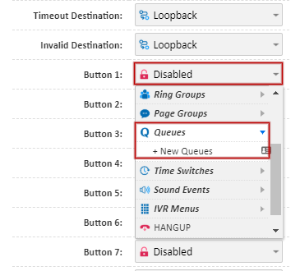
Each of the Button fields corresponds to a number on the caller's phone keypad. In this example, we're using Button 1 for sales ("Press 1 for sales"). For the key that corresponds to your IVR announcement, from the dropdown select Time Switches, then New Time Switch. If you would like to always route to a queue, instead of a time switch, select Queues, then New Queue and skip to Queue Setup below.
Time Switch Setup
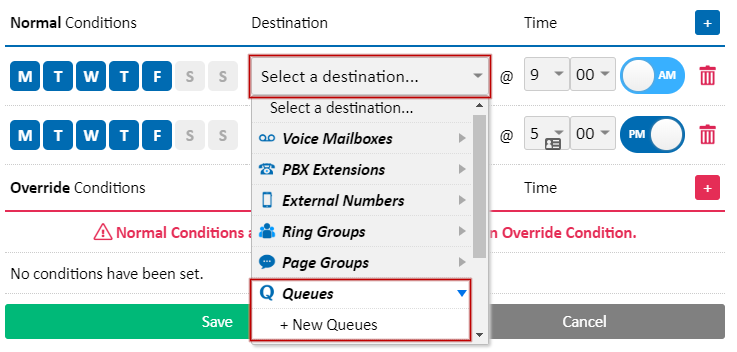
Provide your time switch a memorable name, for example "Sales Hours", then select the timezone this will apply to. For the first rule, select the days of the week and the time at which your office opens. In this example, we'll be setting Monday - Friday, 9AM - 5PM.
Once this has been set, select the Destination drop down for your open event, then select Queues and New Queue
For button 3 in this example, where the option has a mobile overflow and after hours mobile routing, please skip to Queue Setup - with Mobile Divert overflow
Queue Setup
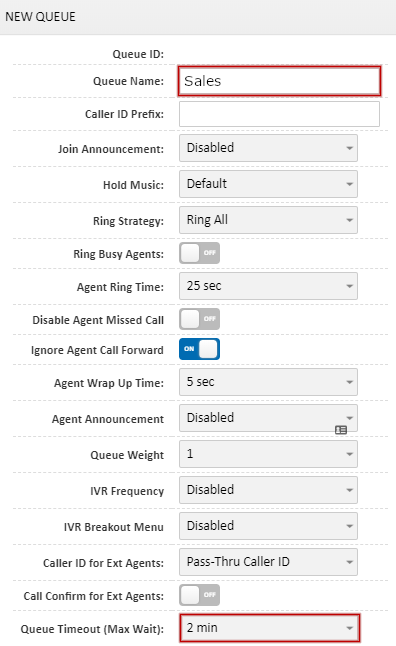
Set your Queue Name to something easily identifiable. We'll use 'Sales' in this example.
If you will have agents in multiple queues, and would like them to be able to identify which queue the call is coming from, you can set Caller ID Prefix to a short text string which will show on the receiving handset as part of the Caller ID. For example, if this is set to SAL and a call is received from 0712345678, the handset's caller ID will show SAL 0712345678.
In the Queue Timeout field, select the maximum amount of time a caller can be in the queue before they are sent to the voicemail box.
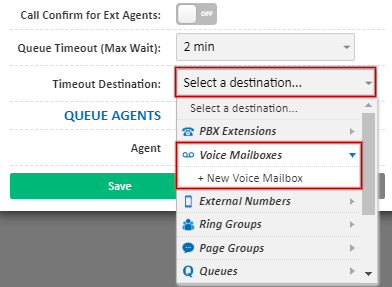
Still within Queue Settings, click Timeout Destination, then select Voice Mailboxes and New Voice Mailbox. If you have an existing mailbox you wish to use as the voicemail for the queue, please select that here and skip the next step.
Configuring Voicemail
Provide a Description for this mailbox, for example "SalesVM". If you wish to customise the greeting customers hear, select the Greeting dropdown. You can either select an existing audio file on your PBX, choose a file from your computer (New Sound (Upload)), or use your phone handset to record a voicemail greeting (New Sound (Record)). This is useful if you would like to replace the default unavailable message with a personalised greeting, for example "Thank you for calling the T-Shirt company. We're all on the phone, but please leave a message and we'll get back to you promptly".
To have any voicemail messages left transcribed and sent to your mobile as a text message, please enter you mobile number in the SMS To field. If you would like a notification in your email when a voicemail is left, set Email To to your preferred email address. By default we will attach the recording of the voicemail message to the email, but if you would prefer this not to happen, set Attach VM to email to No.
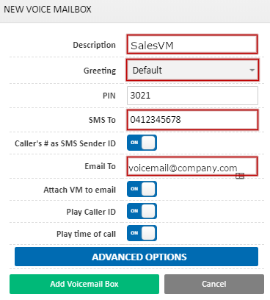
Once complete, click Add Voicemail Box and answer Yes in the confirmation prompt.
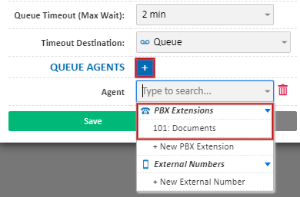
You will now be returned to the Queue settings, and will see the new mailbox reflected in Timeout Destination. To finish configuring the queue, click the + button for Queue Agents, once for each extension you wish to have in the queue. For example, if you have 3 helpdesk extensions, click this 3 times.
For each added agent, click the dropdown box, then select PBX Extensions and select the extension to add.
Once you have added all your agents, click Save and answer yes to the confirmation prompt.
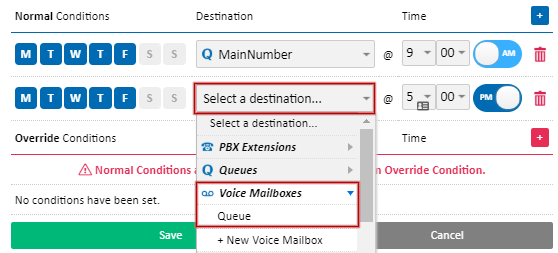
You will be returned to the Time Switch configuration. For your closed event, click Select Destination, then Voice Mailboxes. If you wish, you can re-use the one previously created, or alternatively you can create a new mailbox for after hours calls, in case you wish to have a different mobile number or email address for the receipt of voicemail. If creating a new one, please repeat the New Voice Mailbox step above, using the appropriate details.
Repeat the steps above (from IVR button setup) to setup any additional standard queues (no mobile overflow).
Queue Setup - with Mobile Divert overflow
Set your Queue Name to something easily identifiable, for example "Support"
If you will have agents in multiple queues, and would like them to be able to identify which queue the call is coming from, you can set Caller ID Prefix to a short text string which will show on the receiving handset as part of the Caller ID. For example, if this is set to SUP and a call is received from 0712345678, the handset's caller ID will show SUP 0712345678.
In the Queue Timeout field, select the maximum amount of time a caller can be in the queue before they are sent to the mobile overflow.
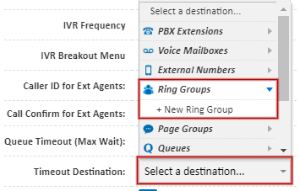
Still within Queue Settings, click Timeout Destination, then select Ring Groups and New Ring Group. If you have an existing ring group of mobile numbers, you may instead select that here.
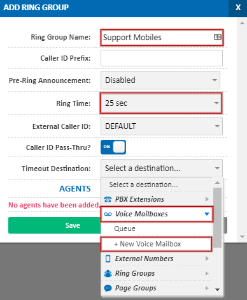
Ring Group Setup
In the Add Ring Group dialog, set the Ring Group Name to something descriptive, for example 'Support Mobiles' and set the ring time to an appropriate amount of seconds - this is normally 25-30 seconds for mobiles.
In the Timeout Destination, select Voice Mailboxes then New Voice Mailbox.
Provide a Description for this mailbox, for example "Support". If you wish to customise the greeting customers hear, select the Greeting dropdown. You can either select an existing audio file on your PBX, choose a file from your computer (New Sound (Upload)), or use your phone handset to record a voicemail greeting (New Sound (Record)). This is useful if you would like to replace the default unavailable message with a personalised greeting, for example "Thank you for calling the T-Shirt company. We're not able to take your call at the moment, but please leave a message and we'll get back to you promptly".
To have any voicemail messages left transcribed and sent to your mobile as a text message, please enter you mobile number in the SMS To field. If you would like a notification in your email when a voicemail is left, set Email To to your preferred email address. By default we will attach the recording of the voicemail message to the email, but if you would prefer this not to happen, set Attach VM to email to No.
Once complete, click Add Voicemail Box and answer Yes in the confirmation prompt to be returned to the Ring Group setup.
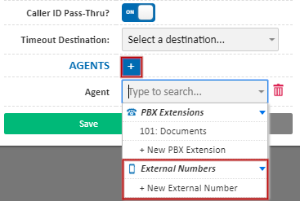
To finish configuring the ring group, click the + button for Agents, once for each external number you wish to call. For example, if you have 2 support mobiles, click this 2 times.
External Number Setup
For the first agent, select the dropdown and choose External Numbers then New External Number
Enter a Description for this number, it may be the person's name, or 'Support Mobile' for example, then enter the number in the Phone field.
When using mobile numbers, we recommend setting Call Confirm to On. This feature prompts the receiver to press 1 to accept the call, which prevents the mobile phone's voicemail or out of service error messages from interrupting the call flow.

Click Save to save your external number. Repeat this step for any additional mobile numbers. Once all agents have been added, click Save on the Ring Group.
You will now be returned to the Queue settings, and will see the new ring group reflected in Timeout Destination. To finish configuring the queue, click the + button for Queue Agents, once for each extension you wish to have in the queue. For example, if you have 3 helpdesk extensions, click this 3 times.
For each added agent, click the dropdown box, then select PBX Extensions and select the extension to add.
Once you have added all your agents, click Save and answer yes to the confirmation prompt.
You will be returned to the Time Switch configuration. For your closed event, click Select Destination, then Sound Events. If you wish, you can re-use one previously created, or alternatively you can create a new sound event for after hours calls.
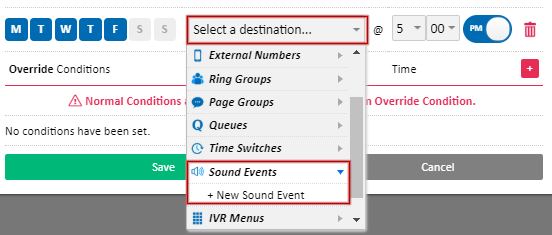
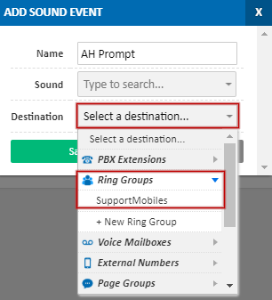
In the New Sound Event popup, set a name for your sound (eg. AH Prompt), then in Sound, you can either select an existing audio file on your PBX, choose a file from your computer (New Sound (Upload)), or use your phone handset to record a sound file (New Sound (Record)). For this example, we would record a message along the lines of "You have reached our after-hours support line. Please wait while we connect you to an on call support agent".
In the Destination field, select the ring group you created in the previous step that contains the mobile numbers.
Click Save on your sound event, then save for the time switch and you will be returned to the IVR. To finalise your configuration, set Button 0 to Loopback, which will return a caller to the start of the IVR, then click Save.
Finally, click Save on the Add Standard DID page. Calls to this number will now route according to the example at the top of this page.
Date created: Jan 23, 2019
Last modified: Aug 21, 2019
Would you like to speak to our  Australian Sales team about our phone system plans?
Australian Sales team about our phone system plans?