Grandstream Automatic Setup & Provisioning
The Auto-Provisioning (Setup) of new Grandstream GRP-series and DP-series phones purchased from us for Hosted PBX services can now be done through either your handset or https://my.maxo.com.au/
Any handsets you have ordered from our online store, at https://www.maxo.com.au/shop will already be attached to your account.
Any handsets purchased from 3rd parties are not compatible with automatic provisioning, and will instead need to be set up manually by following the steps in Grandstream GXP2160 Setup Guide
1 Minute Setup: Configure your new phone directly on the Handset
When you first plug in your new handset, if no profile is associated with it through the My Account Portal as below, it will automatically connect to our platform and display a Setup button on the phone.

To configure your handset, press the Setup button and follow the prompts to set your extension number (normally 3 digits, eg. 101) and provide your name. Once complete, your phone will reboot. If, after 60 seconds, the handset hasn't rebooted, please reboot it manually by pressing the arrow centre key, scroll across to Reboot, then press the centre key again.
2-5 Minute Setup: Configure your new phone using the My Account Portal
To begin configuring your handset/s, login to https://my.maxo.com.au/ and select PBX Extensions
If you are setting up more than one handset, make a note of the MAC address on the back of the handset. See: Locating a Handset MAC Address
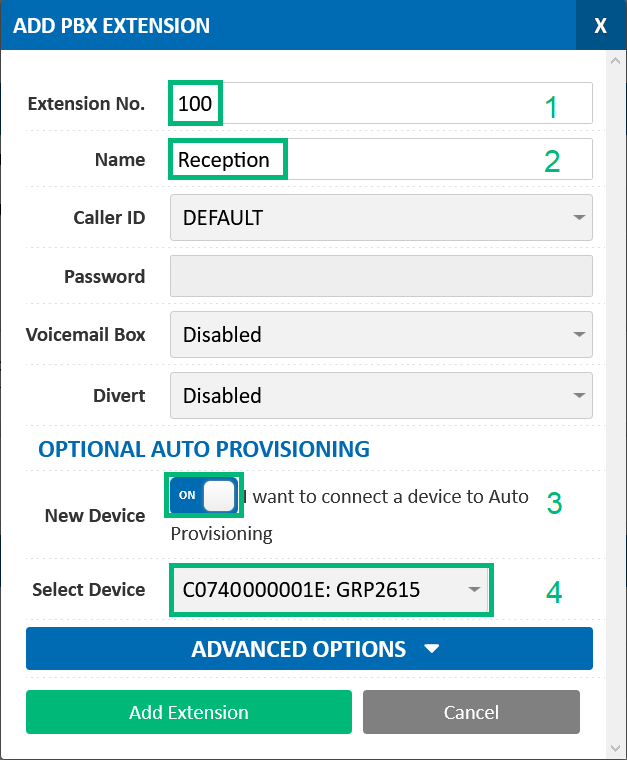
Click  to bring up the Add PBX Extension window.
- Choose an extension number (For example 100 - this is the internal phone number assigned to the phone for transferring and calling within your organisation)
- Type a name for the Extension (i.e Reception)
- Choose "On" (I want to connect a a device to Auto Provisioning)
- Select the MAC from the dropdown box
Finally, press  to complete setup. If your device isn't already plugged in, plug it in now. It may take a moment to pick up the configuration settings. If it doesn't, just unplug it and plug it in again.
To assign Address Books and configure other settings like Hot Desking, Expand the "Configure existing Extension" section below, and modify the existing profile rather than creating a new one.
Once the profile has been added and associated with the handset, you can then plugin the handset. Once it boots up, it will download the configuration and be ready for use. If you have previously connected the phone, a reboot or factory reset may be required before it'll download the configuration. To perform a factory reset, press the Centre key of the arrows, navigate to System, then choose Factory Reset and confirm.
To begin configuring your handset/s, login to https://my.maxo.com.au/ and select PBX Extensions
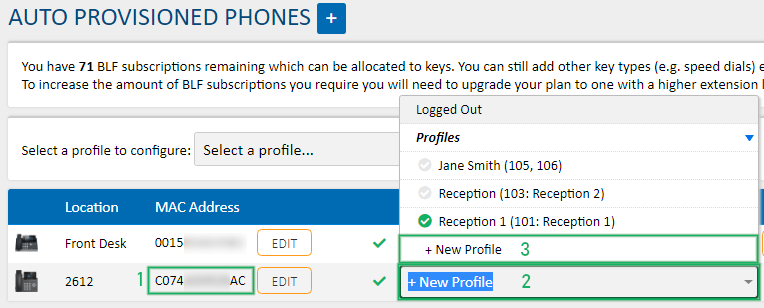
To configure a handset to an extension through the My Account Portal, find the MAC address of the handset you're configuring (1), click in the Profile dropdown (2) and select New Profile (3) or, if you've already created a profile, select the profile you wish to use. To locate a handset's MAC address, for example if you're setting up several and would like to be sure you're working on the correct phone, please see Locating a Handset MAC Address
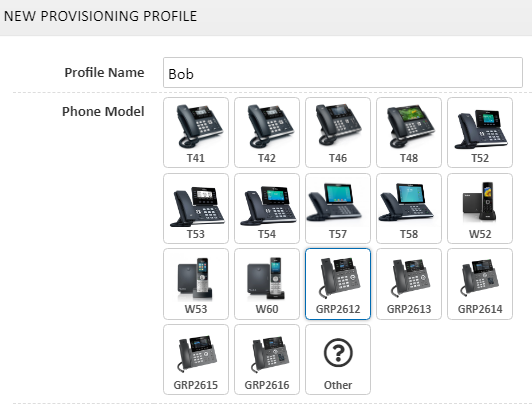
Set the Phone Name, for example 'Bob' and, if it's not already selected, choose the phone's model.
If you'd like the handset to subscribe to any of your Address Books, select the appropriate entry in the Address Book field. To learn more about setting up address books, please see Portal Guide - Address Book

Select the Extension that this phone should connect to from the Extensions field. If this phone should connect to more than one extension, use the +Add Extension button to attach additional extensions. For more information on creating new extensions, please refer to Portal Guide - PBX Extensions and Sip Trunks

Finally, set Hotdesking to enabled or disabled as required and optionally set a hotdesking PIN. For more information on Hotdesking, see Using Hot Desking

Once the profile has been added and associated with the handset, you can then plugin the handset. Once it boots up, it'll download the configuration and be ready for use. If you have previously connected the phone, a reboot or factory reset may be required before it'll download the configuration. To perform a factory reset, press the Centre key of the arrows, navigate to System, then choose Factory Reset and confirm.
Configuring Keys
Grandstream handsets require at least one Line type key to make and receive calls. This is pre-allocated to the top left key of the first page.
To configure the DSS Keys on your phone, locate the extension or phone you'd like to setup, then click Keys

You will be presented with a picture of your handset, along with the keys available for configuration. To add a function to a key, click the key or the corresponding section on the display.

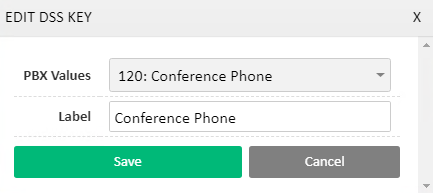
In the resulting popup, you can select which function you'd like the key to perform, along with the target and a name for the key. For example, choosing another person's extension will configure a BLF and Speed dial key, which will show if they're on the phone, and act as a speed dial to them when pressed.
If you have an expansion module, click the + Expansion Module button to show and allow configuration of the additional keys provided. These are configured in the same way, by clicking their line key or corresponding screen section.
![]()
Available Key Types
Line Key: This is a special key type that configures one or more buttons to handle calls coming in to your extension.
PBX Extensions: Configures a key that monitors the state of another extension (eg. on the phone, ringing, available) while also allowing for quick transfers and speed dialling.
External Numbers: Sets up a speed dial key for a number found in Hosted PBX > External Numbers
Timeswitch Positions: Use a key to quickly switch between timeswitch favourites (eg. Lunch timeswitch override). For more information see Time Switch Setup
Call Parking: Configure a key to park a caller and additional keys to monitor individual parking lots, enabling parked caller retrieval. For more information see Call Parking Guide
Custom Values: This allows you to setup a custom key on your handset of either BLF (same functionality as PBX Extensions), Speed Dial (same functionality as external numbers), Line (additional line keys) or Call Park (same functionality as call parking) but manually specifying the target number or extension.
While most keys will synchronise automatically, you can force a resync by clicking the Save & Sync to Phone button.
Resetting Your Phone
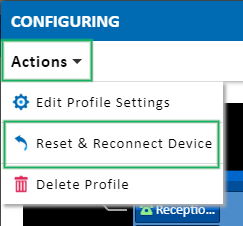
If a phone has previously been provisioned, but requires a factory reset, you'll need to 'release' the provisioning profile before the phone will re-download its configuration. To do so, locate the handset under Configured PBX Extensions or Auto Provisioned Phones and click Keys.
![]()
From the Actions menu, choose Reset & Reconnect Device
Once complete, you can now factory reset your phone. To perform the factory reset, press the Centre Key of the arrows, navigate to System and select Factory Reset.
Troubleshooting
If your handset has not downloaded the configuration set in the My Account Portal or does not show the Setup prompt within 5 minutes of powering on, you can try manually triggering the download by selecting Menu > System > Upgrade > Start Provision.
If the prompt still doesn't appear, your router may be overriding the requests. This behaviour has been seen on Telstra Smart Modems in a DOT environment, but may affect other routers. To stop this override, it's necessary to modify a setting in the handset's web interface.
To access the web interface first retrieve the phone's IP by pressing the menu key, then choosing Status > Network Status. Note down the IPv4 Address, then enter it into a web browser on a computer connected to the same network.
At the Grandstream login prompt, enter the username 'admin'. The password will be listed on a sticker on the bottom of your handset.
Once logged in, navigate to Maintenance > Upgrade and Provisioning > Provision.
Set the field 'Allow DHCP Option 43 and Option 66 to Override Server' to No.
Deselect the check box '3CX Auto Provision'.
Click Save and Apply.
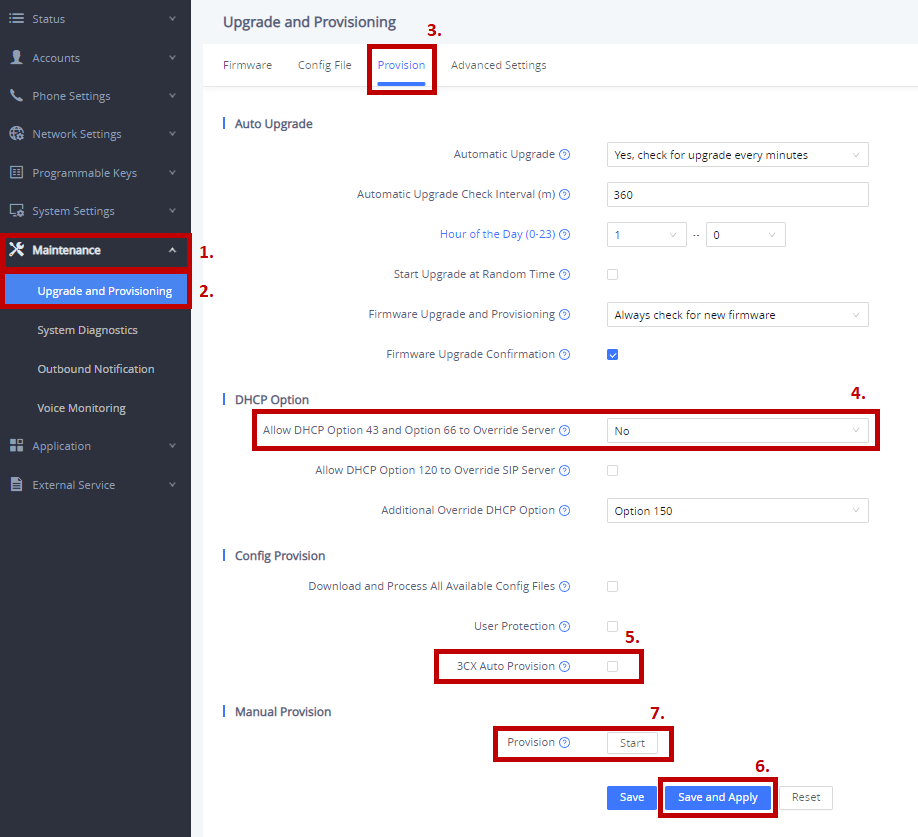
Once the settings have been saved, locate 'Provision', then click Start.
(For phones on older firmware: The Provision option can be found in Maintenance > Tools. Locate Auto Provision then click Start.)
The phone should now show the download symbol and begin the configuration process.
Date created: Jan 28, 2021
Last modified: Sep 14, 2022
Would you like to speak to our  Australian Sales team about our phone system plans?
Australian Sales team about our phone system plans?