Polycom VVX 500 Setup Guide
Polycom VVX 500 Setup Guide
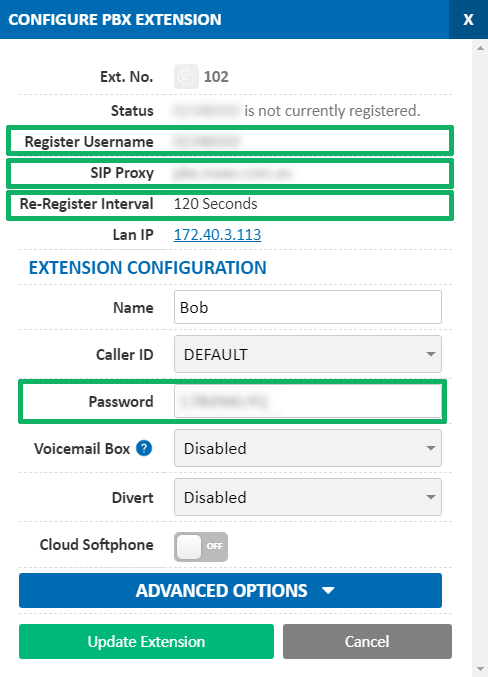
Before you begin, ensure that you've created your extension in the My Account Portal, https://my.maxo.com.au/. To retrieve the details, or create an extension, login to the My Account Portal, then select PBX Extensions or SIP Trunks from the left menu. If creating a new extension, click the Add Extension button, fill in the details and click Save. Find the extension number you're configuring, then click Edit.

Take note of the following fields, as you'll need these to setup the device.
Note: If your phone has been used with another provider in the past, please factory reset it before continuing. To do so, reboot the handset and at the Loading Application prompt, press Cancel. As soon as the welcome message displays, press and hold 1, 3 and 5 until you see the password prompt. Enter the phone's MAC address (located on the back of the handset) using CAPS for the letters, then press OK. The phone will now reset to factory defaults.
As we'll be using the web interface to configure the phone, you'll need to ensure this is enabled. On the handset, select Settings, then Advanced. Enter the admin password (the default is 456), then find Web Server Configuration. In the Mode field, set this to HTTP or HTTPS. Once the web interface has been enabled, close the menus and select Menu, then Status, Network and TCP/IP Parameters. Copy the IP address into a web browser on your computer.
Select Admin as the user and enter the admin password (the default is 456).
Please ensure your phone's firmware is up to date before attempting to configure the handset.
In the title bar, select the Simple Setup section.

On the simple setup page, expand SIP Server, SIP Outbound Proxy and SIP Line Identification
In Address for both SIP Server and SIP Outbound Proxy, enter the SIP Proxy from the Extension's settings, and set the port to 5060
Under SIP Line Identification, set the following:
- Address: this is the extension's Register Username @ SIP Proxy
- Authentication User ID: This is the extension's Password
- Label: This is the label that will be shown on the phone.
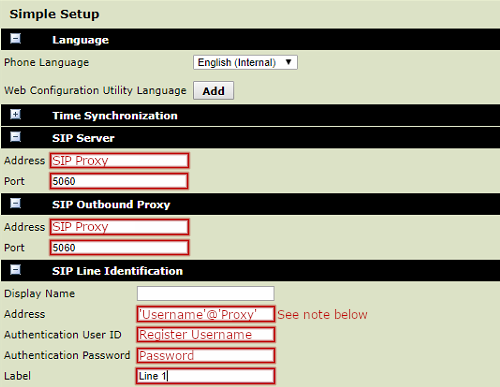
Note: The Address in SIP Line Identification is formatted similarly to an email address. It should be the Register Username, followed by an @ symbol, then the SIP Proxy. For example, if the extension's Register username is 01897101, and the SIP Proxy is pbx.maxo.com.au, this field should be 01897101@pbx.maxo.com.au
Click Save Settings.
From the menu bar, select Settings, then SIP and expand the Server 1 section.
Ensure Transport is set to UDPOnly
Ensure the Address field matches the extension's SIP Proxy, then set Expires to 120.
If you regularly have internet connection problems, you may wish to set the Retry Maximum Count to a number higher than 3 (for example 15).
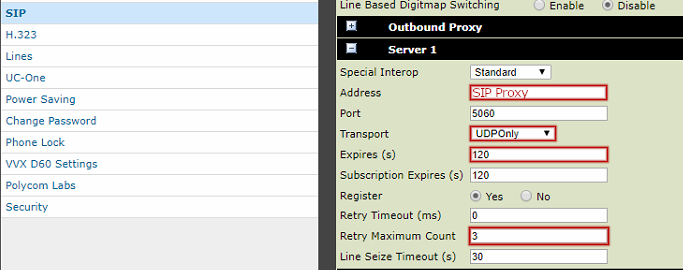
Click Save Settings and your phone may reboot. Once done, it will be registered with the server and ready to make/receive calls
Date created: Feb 18, 2019
Last modified: May 24, 2023
Would you like to speak to our  Australian Sales team about our phone system plans?
Australian Sales team about our phone system plans?