

Cisco ATA FAXING Guide
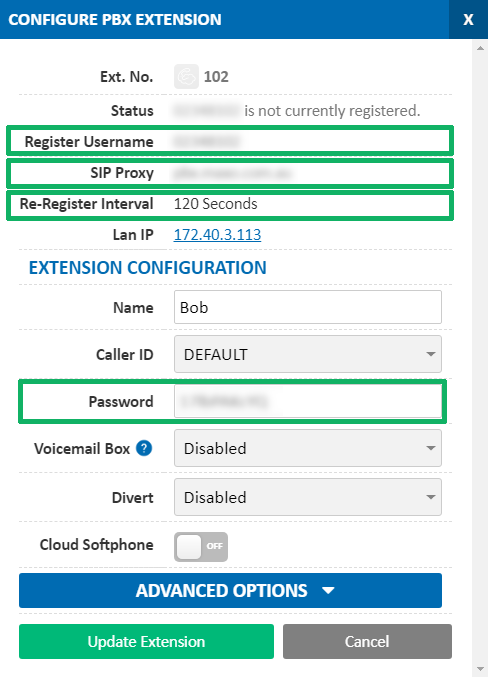
For faxing with an ATA, you'll need to use a SIP Trunk (not a Hosted PBX Extension), as these have the required T.38 protocol enabled. Before you begin, ensure that you've created your extension in the My Account Portal, https://my.maxo.com.au/. To retrieve the details, or create an extension, login to the My Account Portal, then select SIP Trunks from the left menu. If creating a new SIP trunk, click the Add Extension button, fill in the details and click Save. Find the extension number you're configuring, then click Edit.

Take note of the following fields, as you'll need these to setup the device.
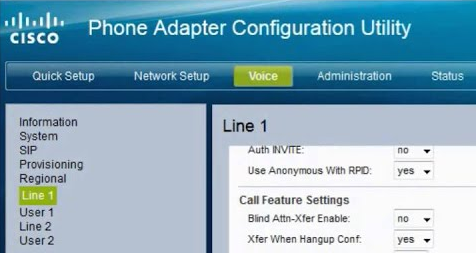
Once you have entered the IP address into your web browser, enter the username and password for the device. By default, these are both admin
Select the Voice tab, then choose Line 1
Update the fields identified below, copying the Register Username, SIP Proxy and Password from the Configure Extension box as required:
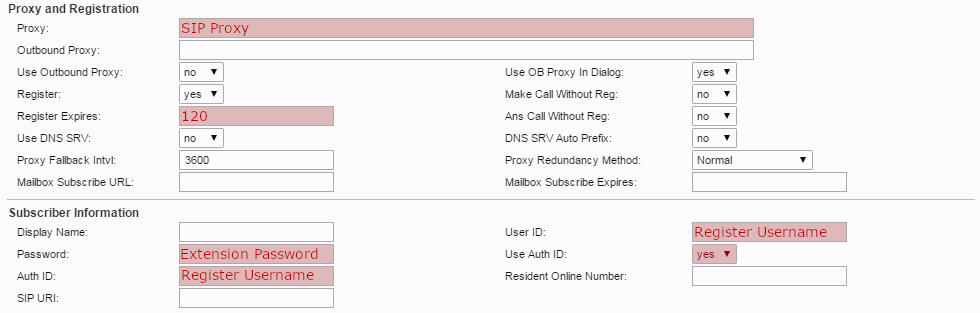
Proxy: SIP Proxy
Register Expires: 120
Display Name: Fax
User ID: Register Username
Password: SIP Trunk Password
Use Auth ID: yes
Auth ID: Register Username
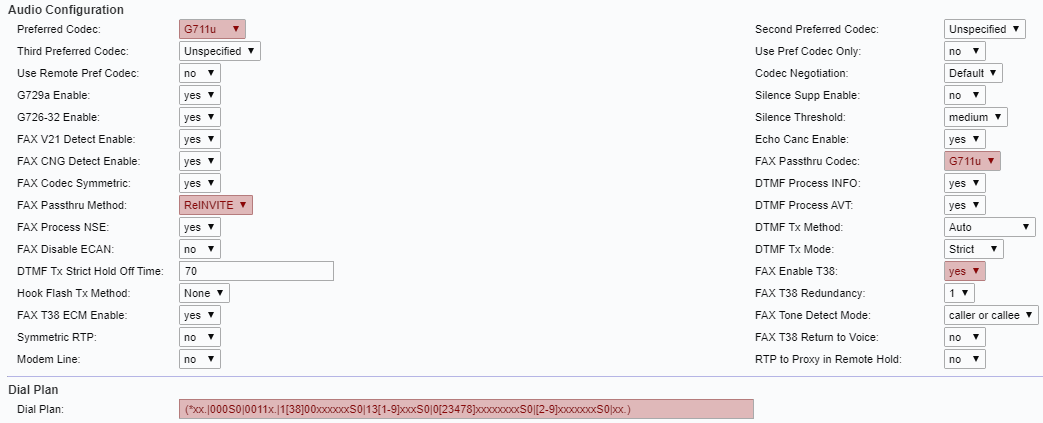
Preferred Codec: G711u
FAX Passthru Codec: G711u
FAX PAssthru Method: ReINVITE
FAX Enable T38: yes
Dial Plan: (*xx.|000S0|0011x.|1[38]00xxxxxxS0|13[1-9]xxxS0|0[23478]xxxxxxxxS0|[2-9]xxxxxxxS0|xx.)
Regional Settings
The following changes are optional, however they will make your SPA ATA sound more
Australian.
Choose Regional from the left menu. Under the Call Progress Tones and Distinctive Ring Patterns headings change:
Dial tone: 400@-19,425@-19,450@-19;10(*/0/1+2+3)
Busy Tone: 425@-19;10(.375/.375/1)
Reorder Tone: 425@-19, 425@-29;60(.375/.375/1,.375/.375/2)
Ring Back Tone: 400@-19,425@-19,450@-19;*(.4/.2/1+2+3,.4/2/1+2+3)
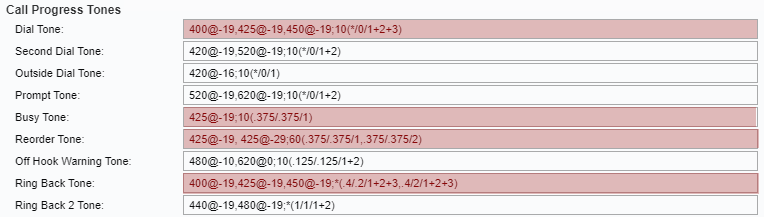
Ring1 Cadence: 60(.4/.2,.4/2)

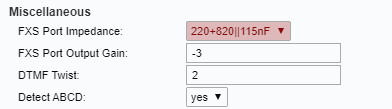
The following changes are required under the "Miscellaneous" heading :
FXS Port Impedance: 220+820||115nF
Once you have saved the settings and the unit has rebooted, you can refresh the 'SIP Trunks' page in https://my.maxo.com.au/, to see if the device has registered. If you are still having issues, please give us a call on 1800 12 12 10
NBN Changes
If your connection is on the NBN, and you're experiencing issues receiving faxes, it may be necessary to change the NBN traffic class of your fax calls. There are two options for traffic classes below - if you're experiencing issues with one, please try the other.
To access this setting, navigate to Voice > Line 1. The fields are in the Network Settings section.

TC1 - High priority, but limited bandwidth
SIP ToS/DiffServ Value: 0xb8
RTP ToS/DiffServ Value: 0xb8
TC4 - Lower priority, with all available bandwidth
SIP ToS/DiffServ Value: 0x68
RTP ToS/DiffServ Value: 0x68
 Australian Sales team about our phone system plans?