Cisco SPA504G Setup Guide
Setup Guide for Cisco SPA504G, 508G, 509G, 512G
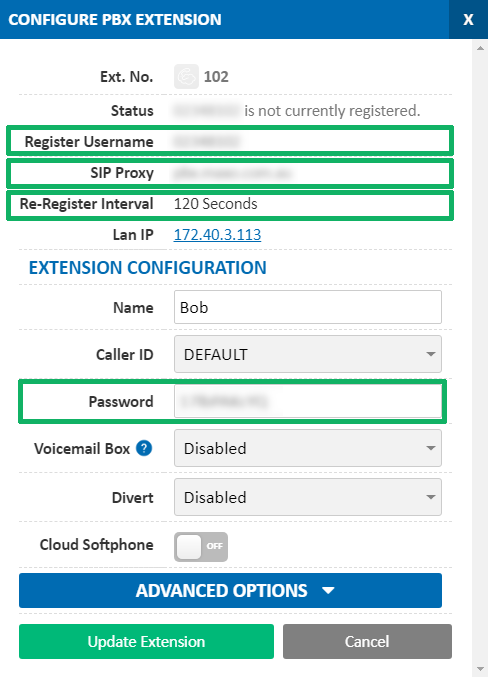
Before you begin, ensure that you've created your extension in the My Account Portal, https://my.maxo.com.au/. To retrieve the details of an existing extension, or create a new extension, login to the My Account Portal and select PBX Extensions or SIP Trunks from the menu, depending on your service type. If you're creating a new extension, click the Add Extension button, fill in the details and click Save. For additional information on creating an extension, please see Portal Guide - PBX Extensions and Sip Trunks Find the extension number you're configuring, then click Edit. Take note of the following fields, highlighted in the image below, as you'll need these to setup the device. Note that if the extension is already configured on a device, you'll need to reconfigure, power down or factory reset the currently connected device before the required information will be displayed.
Note: If your phone has been used with another provider in the past, please factory reset it before continuing. To do so, on the handset press Menu and select Factory Reset. Press OK when prompted and the phone will reset.
To configure a SPA series phone to your MaxoTel service, first retrieve the IP Address so that you can log into the 'Web Configuration' via your computer. To do so on the handset, press the Menu key, then choose Status and Network Status and enter The IP Address into your web browser
Once you are in the Web Configuration click on 'Admin Login' at the top right and enter your password if prompted.
Choose Ext 1, then set the following fields
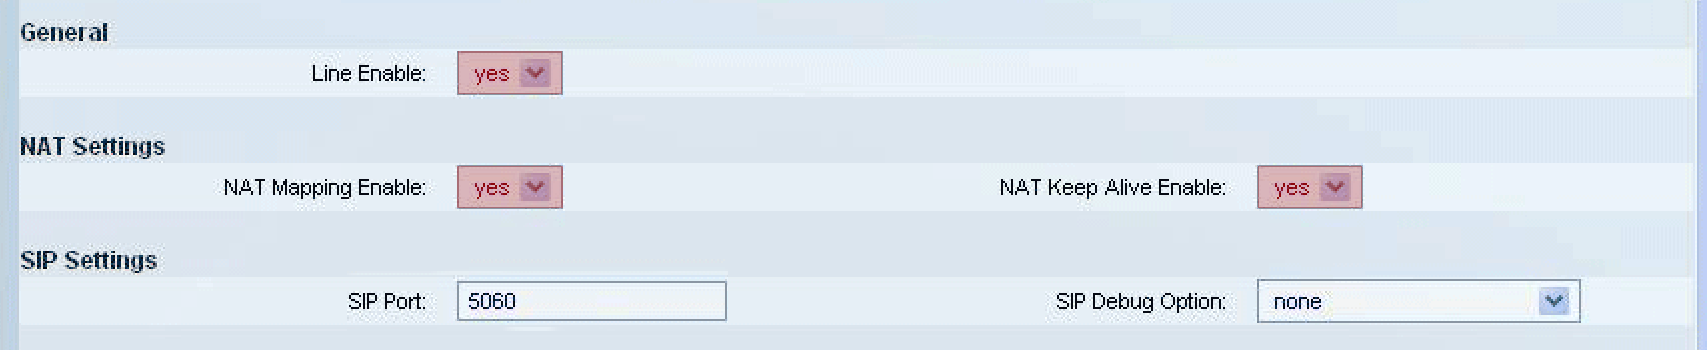
Line Enable: Yes
NAT Mapping Enable: Yes
NAT Keep Alive Enable: Yes
Update the fields identified below, copying the Register Username, SIP Proxy and Password from the Configure Extension box as required:
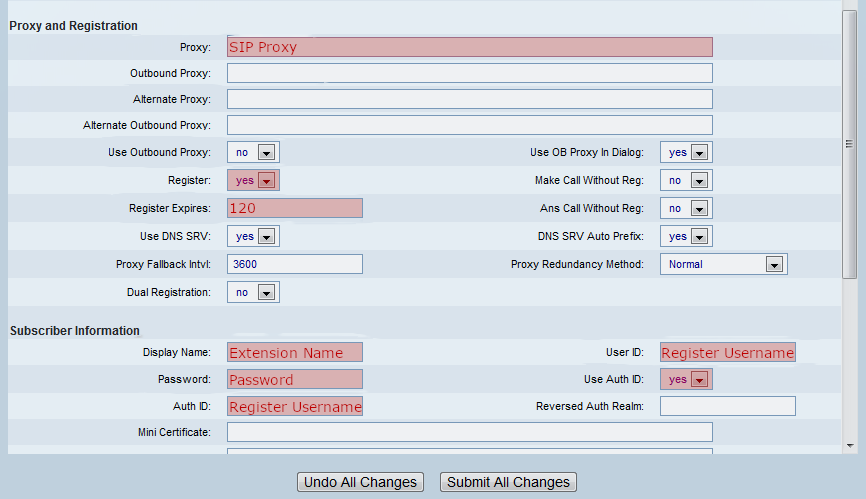
Proxy: SIP Proxy (usually pbx.maxo.com.au or sip.maxo.com.au)
Register: Yes
Register Expires: 120
Display Name: Extension Name
User ID: Register Username
Password: Extension Password
Use Auth ID: Yes
Auth ID: Register Username
On the Phone tab, set the Voice Mail Number to 50002.
NBN Changes
If your connection is on the NBN, and you're experiencing issues receiving faxes, it may be necessary to change the NBN traffic class of your fax calls. There are two options for traffic classes below - if you're experiencing issues with one, please try the other.
To access this setting, navigate to Voice > Line 1. The fields are in the Network Settings section.

TC1 - High priority, but limited bandwidth
SIP ToS/DiffServ Value: 0xb8
RTP ToS/DiffServ Value: 0xb8
TC4 - Lower priority, with all available bandwidth
SIP ToS/DiffServ Value: 0x68
RTP ToS/DiffServ Value: 0x68
 Australian Sales team about our phone system plans?