Grandstream HT801 and HT802 ATA Setup Guide
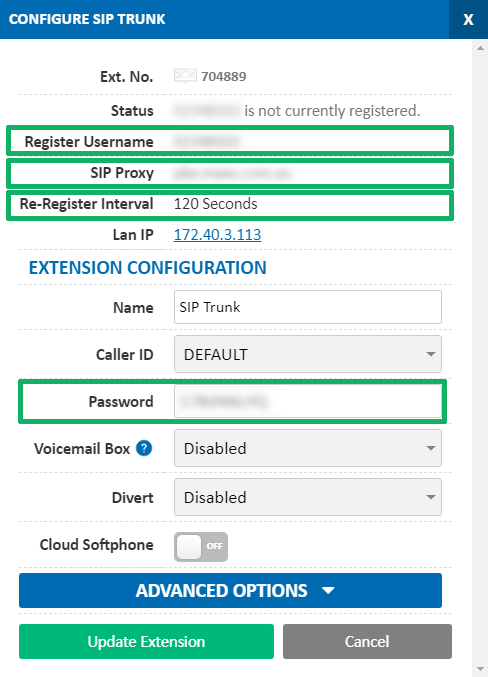
Before you begin, ensure that you've created your extension in the My Account Portal, https://my.maxo.com.au/. To retrieve the details of an existing extension, or create a new extension, login to the My Account Portal and select SIP Trunks from the menu. If you're creating a new extension, click the Add Extension button, fill in the details and click Save. For additional information on creating an extension, please see Portal Guide - PBX Extensions and Sip Trunks Find the extension number you're configuring, then click Edit. Take note of the following fields, highlighted in the image below, as you'll need these to setup the device. Note that if the extension is already configured on a device, you'll need to reconfigure, power down or factory reset the currently connected device before the required information will be displayed.
Accessing the ATA Configuration
The ATA is configured using a built in web interface on the device, which is accessed by entering the device's IP address into your web browser.
Before you can retrieve the IP of the ATA, you will need to ensure the following is completed:
- A handset is connected to the Phone 1 port on the ATA
- The power is connected to the ATA and the power icon is lit
- An ethernet cable is connected from your router to the ATA, and the network
To retrieve the IP address, pickup the connected handset and dial ***
At the menu prompt enter 02 to hear the device's IP address, then enter this into you computer's web browser.
At the device's login page, enter the username and password for the device and login - by default these are both admin
Setting up the ATA
Basic Settings
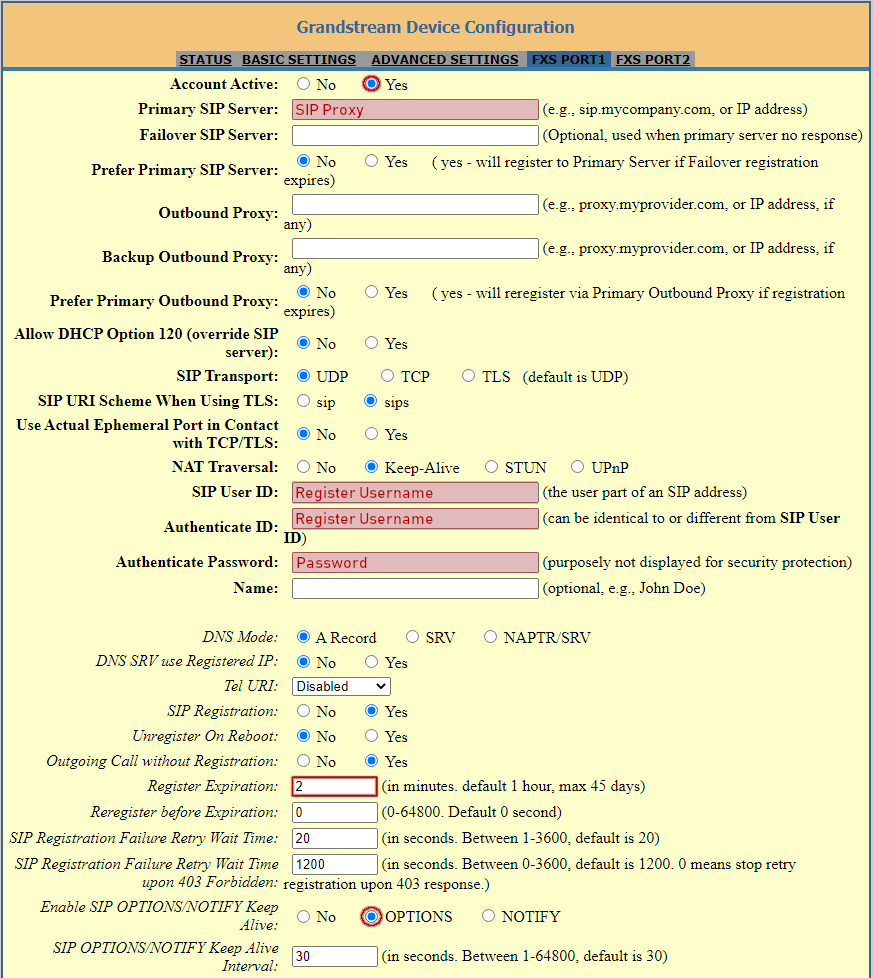
Once you're logged in, choose the FXS Port 1 tab, then enter the details below, copy pasting any fields in italics from the extension details in the My Account Portal.
| Field | Value |
|---|---|
| Account Active | Yes |
| Primary SIP Server | SIP Proxy |
| SIP User ID | Register Username |
| Authenticate ID | Register Username |
| Authenticate Password | Extension Password |
| Name | (Optional) |
| Register Expiration | 2 |
| Enable SIP Options/Notify Keep Alive | OPTIONS |
Additional Customisation
The following changes may not be required, but will help your device sound more Australian and may help call detection by connected fax machines.
FXS Port 1 Tab
| Field | Value |
|---|---|
| SLIC Setting | AUSTRALIA |
| Gain TX | -4dB |
| Fax Specific Settings | |
| Disable Line Echo Canceller | Yes |
| Disable Network Echo Suppressor | Yes |

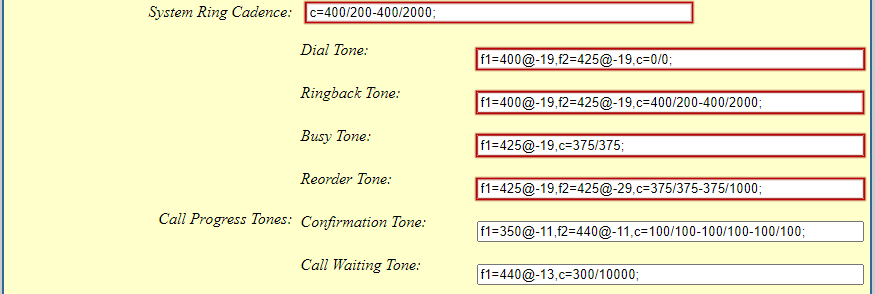
Advanced Settings Tab
| Field | Value |
|---|---|
| System Ring Cadence | c=400/200-400/2000; |
| Dial Tone | f1=400@-19,f2=425@-19,c=0/0; |
| Ringback Tone | f1=400@-19,f2=425@-19,c=400/200-400/2000; |
| Busy Tone | f1=425@-19,c=375/375; |
| Reorder Tone | f1=425@-19,f2=425@-29,c=375/375-375/1000; |
NBN Specific Settings
If your connection is on the NBN, and you're experiencing issues receiving faxes, it may be necessary to change the NBN traffic class of your fax calls. There are two options for traffic classes below - if you're experiencing issues with one, please try the other.
The following settings are on the FXS Port 1 tab under Layer 3 QoS
TC1 - High priority, but limited bandwidth
SIP DSCP: 26
RTP DSCP: 46
TC4 - Lower priority, with all available bandwidth (Recommended)
SIP DSCP: 26
RTP DSCP: 26
 Australian Sales team about our phone system plans?