

Manually Configure Yealink Cordless
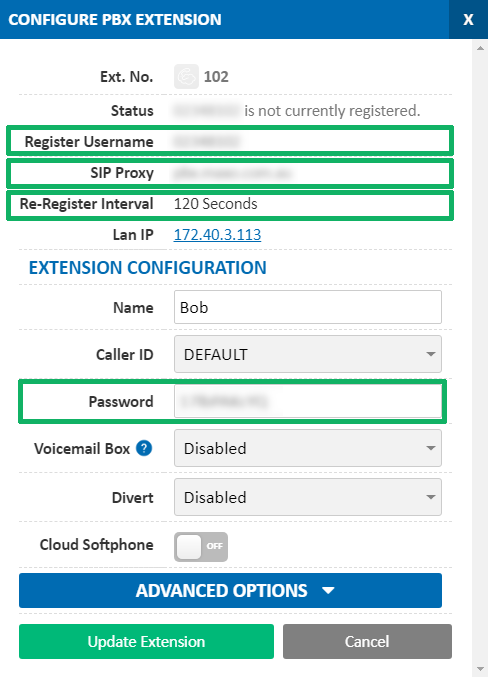
Before you begin, ensure that you've created your extension in the My Account Portal, https://my.maxo.com.au/. To retrieve the details of an existing extension, or create a new extension, login to the My Account Portal and select PBX Extensions or SIP Trunks from the menu, depending on your service type. If you're creating a new extension, click the Add Extension button, fill in the details and click Save. For additional information on creating an extension, please see Portal Guide - PBX Extensions and Sip Trunks Find the extension number you're configuring, then click Edit. Take note of the following fields, highlighted in the image below, as you'll need these to setup the device. Note that if the extension is already configured on a device, you'll need to reconfigure, power down or factory reset the currently connected device before the required information will be displayed.
Note: If your device has previously been used with another provider, please factory reset it before continuing. To do so from the base station, unplug the power then hold the 'Connect' button on the front while powering back up. Once all 3 lights are lit, you can release the Connect button and the unit will factory reset. To factory reset from a connected handset, choose Menu > Settings > System Settings > Base Reset.
To configure the Cordless base station Series to your MaxoTel account, first retrieve the IP Address so that you can log into the 'Web Configuration' via your computer. To do this, enter The IP Address of the device into your web browser. For instructions on how to obtain the IP address of your device, please see Yealink W60 / W52 / W56 Cordless Phones - How to get the Base IP address
Once you are on the Web Configuration page enter the username and password. By default the username will be 'admin' and the Password will be 'admin'.
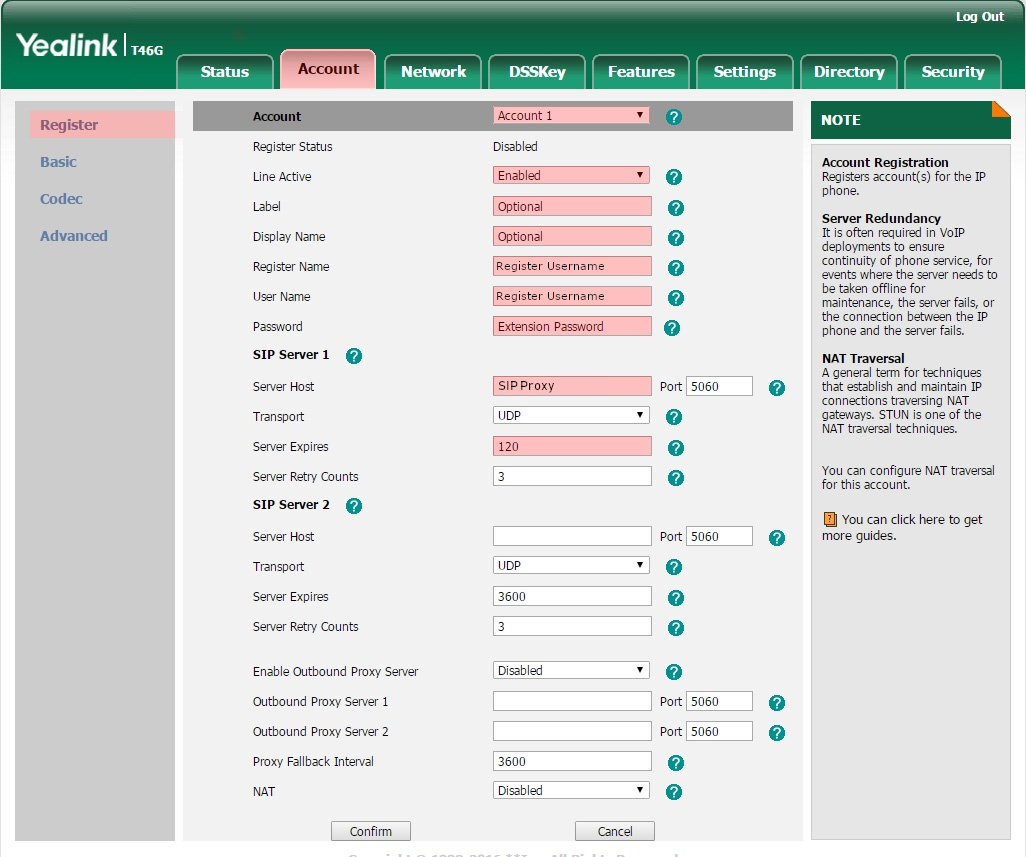
Once you have successfully logged in, click on the 'Account' tab across the top. Fill in the highlighted fields below, copying the Register Username, Extension Password and SIP Proxy from the configure PBX Extension dialog:
| Yealink | My Account Portal |
|---|---|
| Register Name | Register Username |
| User Name | Register Username |
| Password | Password |
| Server Host | SIP Proxy (normally pbx.maxo.com.au for Hosted PBX, or sip.maxo.com.au for SIP trunking plans |
If you are only using one handset with this base station, then the setup should be complete.
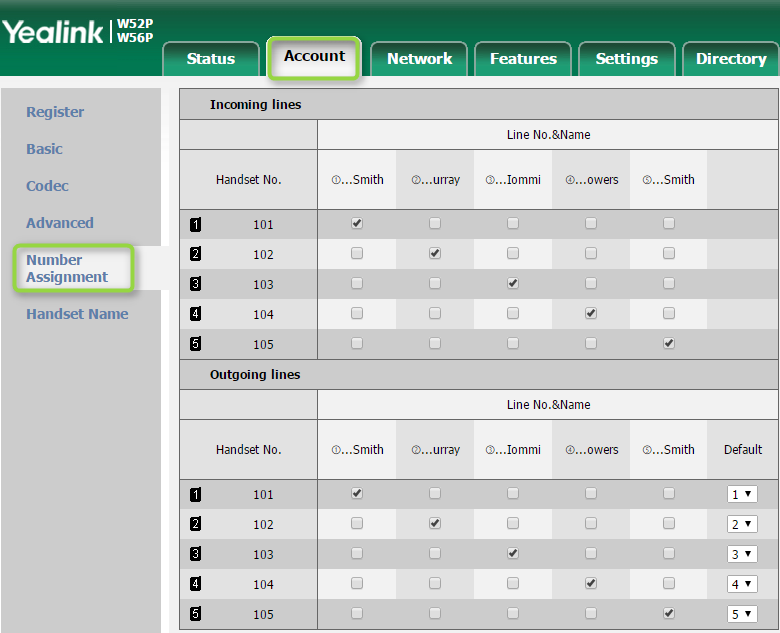
If you are using multiple handsets on the one base station, you can either have all handsets use the one Extension, or configure individual Extensions for each phone, and assign them accordingly in the 'Number Assignment' page.
In the Incoming Lines table, select which phones (left column) should ring when a call is received on each extension registered to the phone (top row)
In the Outgoing Lines table, select the Default account (right column) that each handset (left column) should use when making outbound calls.
For example, if you have 5 extensions and 5 handsets registered to one base station, and would like each handset to use only its own extension for inbound and outbound, your configuration would look similar to this:
In addition, if you're using a W60B base station and have more than 4 handsets, you'll also need to change Features > General Information > Number of Active Handsets to 8. The W52P base only supports 4 active calls.
If you require more information on this part, please don't hesitate to contact MaxoTel.
Now that the extension is registered you will now want to set the time zone and time format, which can be done under the top 'Phone' tab, and then the 'Preferences' button on the left.
At this point, the phone should be ready to go. If you have any troubles making and receiving calls from here on in, please give MaxoTel a call on 1800 12 12 10.
Additional Settings
NBN Users
If you experience audio issues when there is more than one concurrent call in progress on your NBN connection, you may need to change the NBN traffic class used by your voice traffic. There are two options for traffic classes below - if you're experiencing issues with one, please try the other.
To access this setting, choose Network > Advanced and locate the QoS section.
TC1 - High Priority, but limited bandwidth.
This traffic class can only support a limited number of calls (normally 1), depending on how much bandwidth has been purchased by your ISP. This is different to your normal (25/5, 50/20, etc.) bandwidth.
Audio QoS: 46
SIP QoS: 26
TC4 - Lower Priority, with all available bandwidth.
Phones in this traffic class will be able to utilise the full bandwidth of your NBN connection (eg. 50/20)
Audio QoS: 26
SIP QoS: 26
SIP Port Number
On some routers, it may be necessary to manually set each phone to a different local port number to mitigate some NAT related problems. To access this setting, choose Settings > SIP and locate Local SIP Port
For each device you're changing, we recommend incrementing this port number, beginning at 5070 for the first handset, 5071 for the second, etc.
 Australian Sales team about our phone system plans?