Get 20% off Yealink Headsets when purchasing any Yealink desk phone View Headsets 20% off Yealink Headsets with Yealink desk phone purchase

Setup Guide for Asterisk

Asterisk is fully compatible with MaxoTel VoIP.

Before you begin, ensure that you've created your extension in the My Account Portal, https://my.maxo.com.au/. To retrieve the details of an existing extension, or create a new extension, login to the My Account Portal and select SIP Trunks from the menu. If you're creating a new extension, click the Add Extension button, fill in the details and click Save. For additional information on creating an extension, please see Portal Guide - PBX Extensions and Sip Trunks

Find the extension number you're configuring, then click Edit.

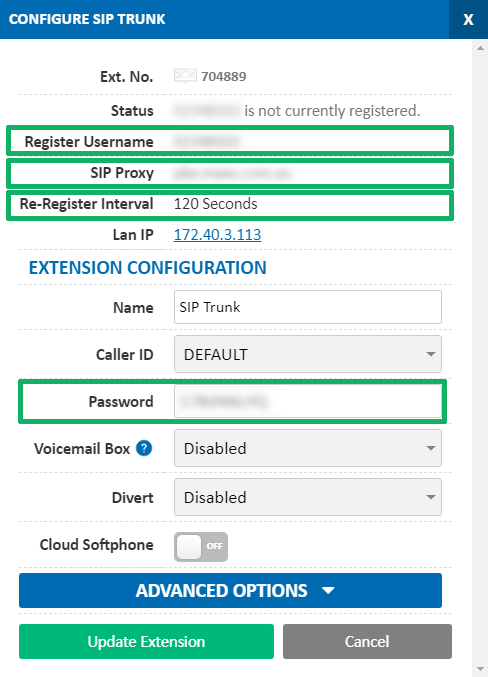
Take note of the following fields, highlighted in the image below, as you'll need these to setup the device. 

  • Register Username: This is the full username, not the short Ext No.
  • SIP Proxy: The server you'll be connecting to.
  • Re-Register Interval: Defines how often your device should check in.
  • Password: The extension's password

Note that if the extension is already configured on a device, you'll need to reconfigure, power down or factory reset the currently connected device before the required information will be displayed.

Please choose your Asterisk deployment type below for configuration details.


FreePBX (chan_sip based)

1. Log into FreePBX.

2. Click the Setup link at the top of the page, then "Trunks", to the left of the page.

3. Click "Add SIP Trunk"

4. Scroll down to "Outgoing Settings".

5. Type MaxoTel into "Trunk Name"

6. Enter the following into PEER Details, copying the bold fields from the Configure SIP Trunk dialog.

(add fromuser=RegisterUsername if you have multiple SIP trunks on the same Asterisk box):

context=from-trunk
fromdomain=sip.maxo.com.au
user=RegisterUsername
host=sip.maxo.com.au
insecure=very
secret=Password
type=peer
username=RegisterUsername

7. Type your Register Username into "User Context"

8. Enter the following into USER Details, copying the password from the Configure SIP Trunk dialog:

context=from-trunk
insecure=very
secret=Password
type=user

9. Enter this into your register string, copying the fields from the Configure SIP Trunk dialog:

RegisterUsername:Password@sip.maxo.com.au/RegisterUsername

10. Be sure to reload asterisk after making changes to configuration files. You will have to then setup your dial plan in extensions.conf so that when you dial a number, it goes out through SIP/MaxoTel/number_to_dial


For example, if your SIP Trunk's register username is 70001 with a password of 12345, your configuration will look similar to this:

Peer Details

context=from-trunk
fromdomain=sip.maxo.com.au
user=70001
host=sip.maxo.com.au
insecure=very
secret=12345
type=peer
username=70001

User Details

context=from-trunk
insecure=very
secret=12345
type=user

Register String

70001:12345@sip.maxo.com.au/70001

FreePBX (PJSip based)

These instructions provide the basic required configuration to connect your FreePBX to MaxoTel

You will also need to configure your extensions, any additional features, and your routes before you can make and receive calls. Please refer to the FreePBX admin guide for details on how to complete these.

  1. Login to FreePBX
  2. Hover over Connectivity, then selectTrunks
  3. Click Add Trunk then Add SIP (chan_pjsip) Trunk
  4. Set your Trunk Name to your RegisterUsername
  5. Choose the pjsip Settings tab and enter the following:
    1. Username: RegisterUsername
    2. Auth username: RegisterUsername
    3. Secret: Password
    4. Authentication: Outbound
    5. Registration: Send
    6. SIP Server:sip.maxo.com.au
    7. SIP Server Port: 5060
  6. Choose the Advanced tab and set the following:
    1. DTMF Mode: RFC2833 / RFC4733
    2. Expiration: 120
    3. Contact User: RegisterUsername
  7. Save, then Apply Changes


Once complete, you will need to setup your dialplan under Connectivity > Inbound Routes and Connectivity > Outbound Routes to use the new trunk.


Asterisk : chan_sip Based

Login to your Asterisk server and add the following lines to your sip.conf file, copying the bold fields from the Configure SIP Trunk dialog.

Include the following line in the [general] section of your sip.conf:

register=RegisterUsername:Password@sip.maxo.com.au/RegisterUsername


Add the following lines to the bottom of your sip.conf:

[RegisterUsername]
type=user
secret=Password
insecure=very
context=from-trunk

[trunkName]
username=RegisterUsername
type=peer
secret=Password
insecure=very
host=sip.maxo.com.au
fromuser=RegisterUsername
fromdomain=sip.maxo.com.au


For example, if your SIP Trunk's register username is 70001 with a password of 12345, your configuration will look similar to this:

register=70001:12345@sip.maxo.com.au/70001

[70001]
type=user
secret=12345
insecure=very
context=from-trunk

[trunkName]
username=70001
type=peer
secret=12345
insecure=very
host=sip.maxo.com.au
fromuser=70001
fromdomain=sip.maxo.com.au


Be sure to reload asterisk after making changes to configuration files. You will have to then setup your dial plan in extensions.conf so that when you dial a number, it goes out through SIP/MaxoTel/number_to_dial


Asterisk : PJSip Based

Login to your Asterisk server and add the following lines to your pjsip.conf file, copying the bold fields from the Configure SIP Trunk dialog.


[trunk]
type = registration
outbound_auth = trunk-auth
server_uri = sip:sip.maxo.com.au
client_uri = sip:RegisterUsername@sip.maxo.com.au
retry_interval = 60
expiration = Re-Register Interval

contact_user = RegisterUsername


[trunk-auth]
type = auth
auth_type = userpass
username = RegisterUsername
password = Password
realm = sip.maxo.com.au


[endpoint]
type=endpoint
context = Trunk-Incoming
allow = !all,ulaw,alaw,g729
outbound_auth = endpoint-auth
aors = endpoint-aor
direct_media = no
from_domain = sip.maxo.com.au

contact_user = RegisterUsername


[endpoint-auth]
type = auth
auth_type = userpass
username = RegisterUsername
password = Password
realm = sip.maxo.com.au


[endpoint-aor]
type = aor
contact = sip:sip.maxo.com.au


[endpoint-identify]
type=identify
endpoint = endpoint
match = 202.52.129.0/24


Be sure to reload asterisk after making changes to configuration files. You will have to then setup your dial plan in extensions.conf so that when you dial a number, it goes out through PJSIP/${EXTEN}@endpoint


contact_user=726467

Would you like to speak to our Australian Sales team about our phone system plans?
Yes, please!No