

Adding and Managing Portal Users
The Organisation Login system allows you to grant access to https://my.maxo.com.au/ for other members of your team. Their access can either be a full administrator or restricted, depending on the settings chosen.
Initial Setup
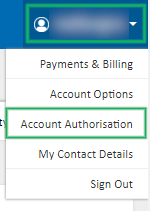
To begin using Organisation Logins, login to https://my.maxo.com.au/ with your normal administration account, then select your username at the top right and choose Account Authorisation
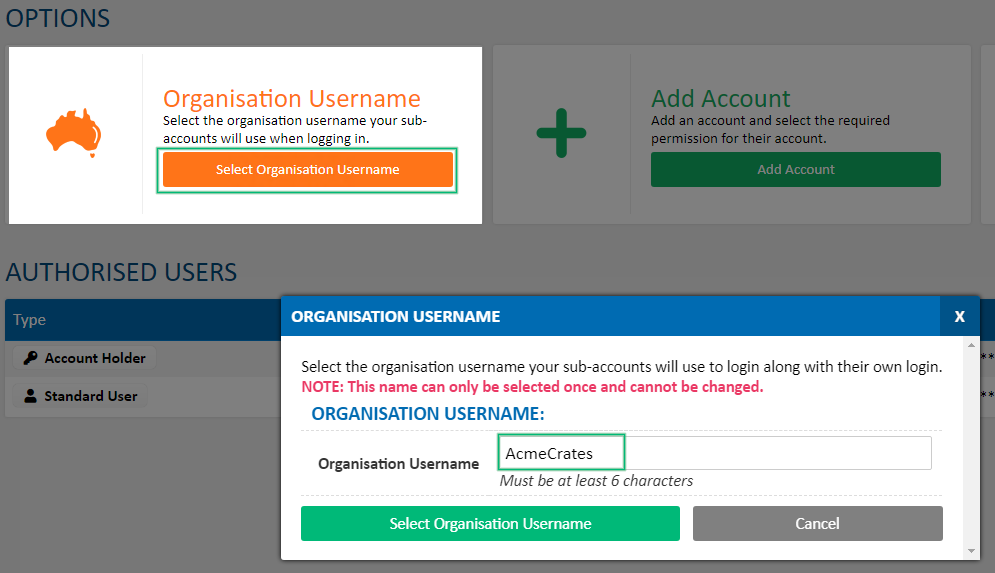
Before you can begin adding users, you will need to set an Organisation Username - this identifies which account any created users will be associated to, and will need to be provided to any created users.
To set your organisation username, click Select Organisation Username, then enter your desired organisation username and click Select Organisation Username to save. Please note that this name can only be selected once and cannot be changed.
As an example, if your business is ACME Crates and you're setting up access for a team member Jane, you may wish to set your organisation username to AcmeCrates or AcmeTeam.
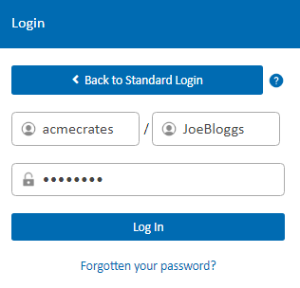
When Jane goes to login, she'll specify the organisation username first at the login page, followed by her individual username (eg. AcmeCrates \ Jane)
Creating Users
For any staff member that will be provided Portal access, you'll need to create a user. To do so, click the Add Account button.

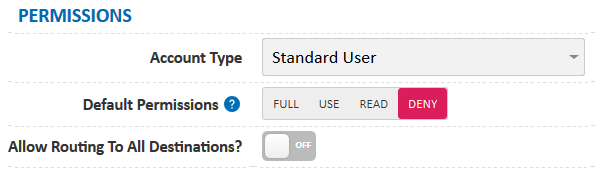
In the presented window, select the user's account type from either Administrator (full access to all sections) or Standard User (restricted, configurable permissions).
Next, select the default permissions that should apply to this user, from either:
| Permission Level | Access |
|---|---|
| Full | View, create, edit and delete |
| Use | View, create and edit |
| Read | View only |
| Deny | Can't see item |
Note: Global permissions are overridden by any more specific rules, per the Permissions section below.
Depending on their access requirements, it may be simpler to enable Full or Use access, then revoke individual sections, or to Deny everything by default and grant access to only some sections.
Select whether this user should have Allow Routing to All Destinations enabled, which will allow the user to set the route for an element they have control over to an element they do not. As an example, this would allow a user in Office A to update a phone number they have Full or Use permission on to route to the main IVR menu in Office B, regardless of the staff member not having access to the IVR menu in Office B.
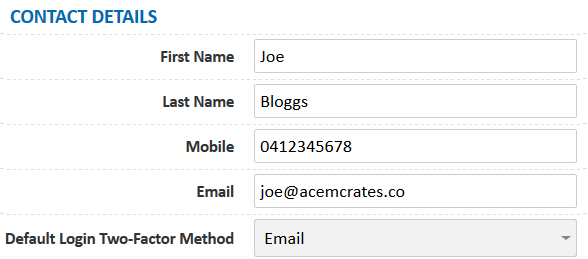
The Contact Details section collects the name, mobile and email of the new user. These details are used to provide the user verification link, along with facilitating the required Two-factor authentication for any organisation users by either Authenticator App, Email or SMS.
Finally, set the username for the new user. If you select their extension in the Extension box, the username will be prefilled based on their extension, or you can set their username manually by specifying the Username field.
Once all the section are filled in, click Save to create the user. Note that they'll need to be sent a verification email before they can login. This verification email can be sent at any time, so you may wish to finalise their permissions (as below) before sending the activation email.
Any users that have not yet been sent an activation email, or haven't clicked the link will have an exclamation point in their Status column. To send, or re-send the verification email click Edit
![]()
In the edit box, click Send new activation email.

Logging in to Organisational Accounts
To access your organisation account, use the link in your organisation activation email, or at the https://my.maxo.com.au/ login screen select Switch to Organisation Login If you're using the link in your email, the organisation will already be set. If you're manually accessing the login page, enter your organisation name, then enter your organisation username and password. You will be prompted to enter your two-factor authentication code, either from your authenticator app or the email or SMS you've received.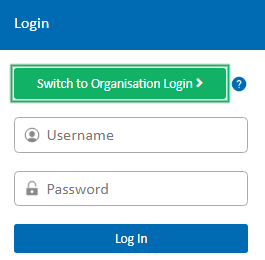
Setting Permissions
Granting or revoking a user's permission is done by locating the relevant user in the Authorised Users list and clicking their Permissions button.
Permissions can be set to the following levels for each item:
| Permission Level | Access |
|---|---|
| Full | View, create, edit and delete |
| Use | View, create and edit |
| Read | View only |
| Deny | Can't see item |
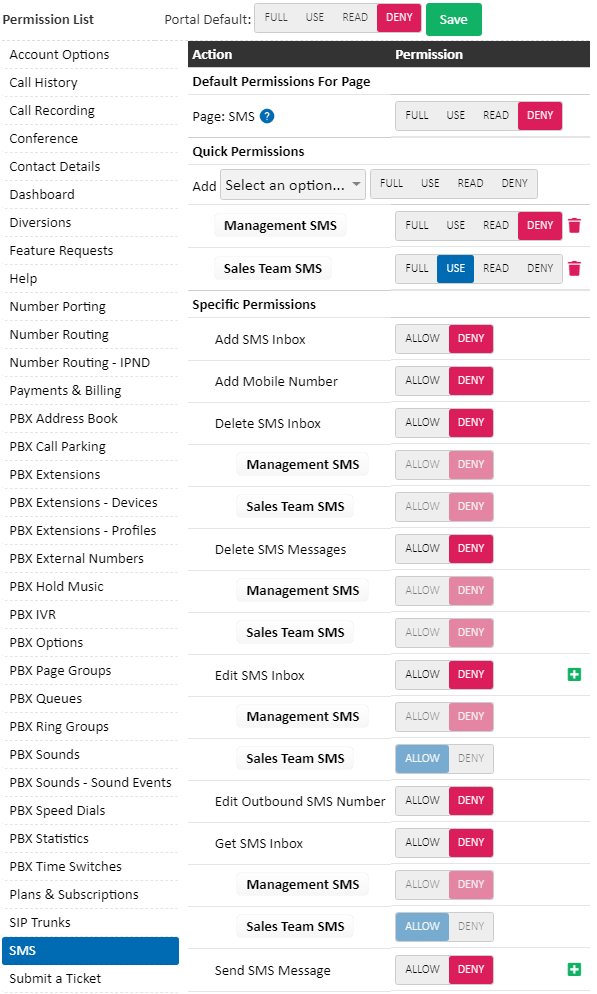
The Permissions List on the left shows all available sections and, when selected, allows you to provide access to the section as a whole, to individual actions within that section, or to individual items within that section.
For each section, you can set the following:
Default Permissions: Controls access to the page, and its sub-sections, as a whole
Quick Permissions: Allows you to specify permission for individual items (for example, a single telephone number) - the will take precedence over the global or default permissions
Specific Permissions: Allows you to specify the permission level for each specific feature.
For any fields where you see a ![]() button, that can be clicked to add permissions additional items (eg. another SMS inbox, another phone number, etc.)
button, that can be clicked to add permissions additional items (eg. another SMS inbox, another phone number, etc.)
As an example, the following permissions on the SMS section will allow the target user to read and send SMS messages from the Sales Team SMS inbox, but will deny them access to the Management SMS inbox.
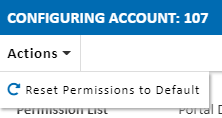
Should you need to reset a user's permissions to the global defaults, select the Actions menu in the edit permissions box, then choose Reset Permissions to Default
Removing an Authorised User
Should you need to remove a user, for example if they've left the company, you can do so by locating their account in the list of Authorised Users, then clicking the trash icon for their user.
![]()
 Australian Sales team about our phone system plans?