

Setting up Voicemail
Set up a Voicemail Box in order to receive messages from your callers when you're unavailable. Message notifications can be sent via SMS, Email, and to your VoIP handset.
Overview
A new voicemail box cannot setup from a phone. A greeting can only be recorded on the handset, or uploaded via the My Account portal once the voicemail box has been created and the extension has been linked to it.
- Create a Voicemail Box on Voicemail Tab of My Account portal.
- Assign the Voicemail Box to extension on PBX Extensions page (this allows the extension to check their voicemail and record their message by dialling *97 or by pressing the voicemail key)
- Set diversion options on the Extension so that unanswered callers can leave a message.
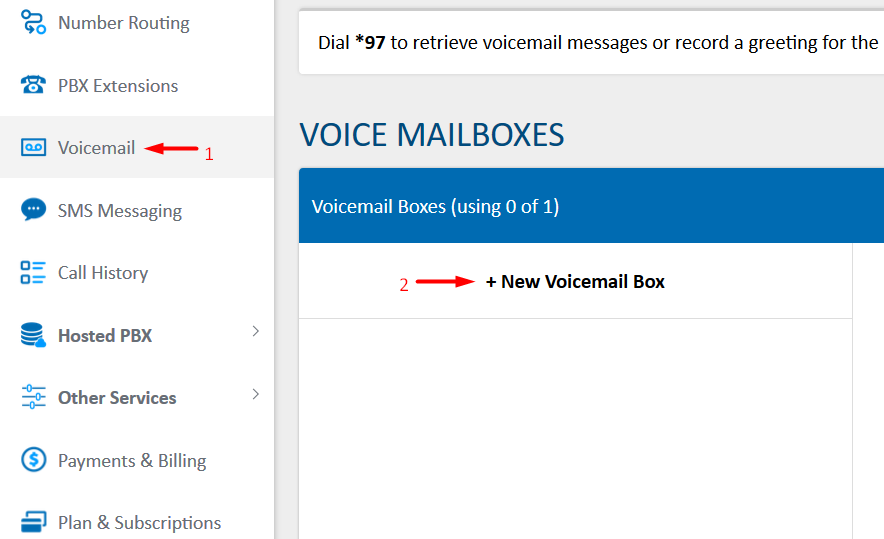
1. Create a Voicemail Box
Click the Voicemail Page in the My Account Portal, and then click +New Voicemail Box. Enter in the name of the Voicemail Box, and any contact details for the user and then click Add Voicemail Box
2. Additional Options & Multiple Greetings
To configure multiple greetings on your Voicemail box, choose Blank (For Sound Event). You can add record or upload multiple greetings to the Sounds Page (as Sounds), and then create Sound Events which play the sound, and then forward to the voicemail box as illustrated below:
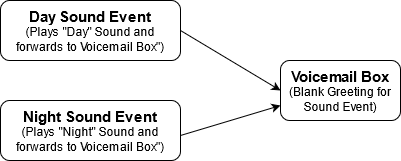
Learn how to create a Sound Event Here: Portal Guide - Sounds and Sound Events
Voicemail Box Options
The Description field sets the display name for the mailbox, and should be set to something easily identifiable, for example, Paul's Mailbox or Company Voicemail.

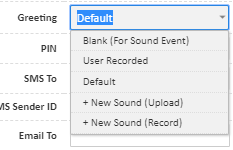
Greeting sets the message that is played to the caller before they're prompted to leave a message. This list will show any available sounds on your service to select from. A new message can be added by selecting either New Sound (Record) or New Sound (Upload). If instead the greeting will be set from a handset dialling into the mailbox (using *97 or 50003), select User Recorded. Additionally, to set no greeting, if the caller will be reaching the mailbox via a sound event, set this to blank.
PIN sets the PIN number that's required to login to the mailbox when dialling it from a handset to check voicemails or update the user recorded greeting.

SMS To is an optional field. If this is set to a mobile number, the server will transcribe the voice recording to text and send it as an SMS to the number entered here. To disable transcription, leave this field blank.
Caller's # as SMS Sender ID works with the above message transcription. This will show the text message as being received from the original caller's number, making it easy to return their call from the mobile device.

Email To is an optional field. Setting this will send an email notification to the address specified when a voicemail is left in this mailbox.
Attach VM to email works with the above setting and, when enabled, attaches the audio file of the voicemail to the notification email.

Player Caller ID specifies if, when checking voicemails, the system should announce the original caller's phone number
Play time of call specifies whether, when checking voicemails, the system should announce the time the voicemail was received.
Advanced Options
Play greeting then hangup will, instead of inviting the caller to leave a message, play the audio file specified in Greeting, then disconnect the call.
Retain Messages sets the maximum amount of time a voicemail message can remain in the mailbox before it is automatically deleted.
Auto mark as read will set any voicemails in the mailbox to read, instead of new.
Message transcription enables or disables the voice to text service, used for generating the voicemail previews
3. Assign it to an Extension or SIP Trunk
Once done, save your mailbox, then navigate to PBX Extensions or SIP Trunks, depending on your service type.
For any extensions that should be notified when a voicemail is left, click Edit for that extension, then in the Voicemail Box field, select the voicemail box you just created. This will present a message waiting indicator on a connected device, or a stutter dialtone when you have new messages.


4. Enable Incoming Callers to leave a message when the call is unanswered
Edit any extensions that should forward to voicemail, then in the Divert field, select Busy/XX, where XX is the number of seconds it should try to call your extension before going to voicemail. In the Divert To field, select the mailbox you've just created, then click Update Extension.
Once complete, if your phone is busy, or if it is unanswered for the amount of time specified in the Divert field, the caller will be sent to your voicemail box to leave a message.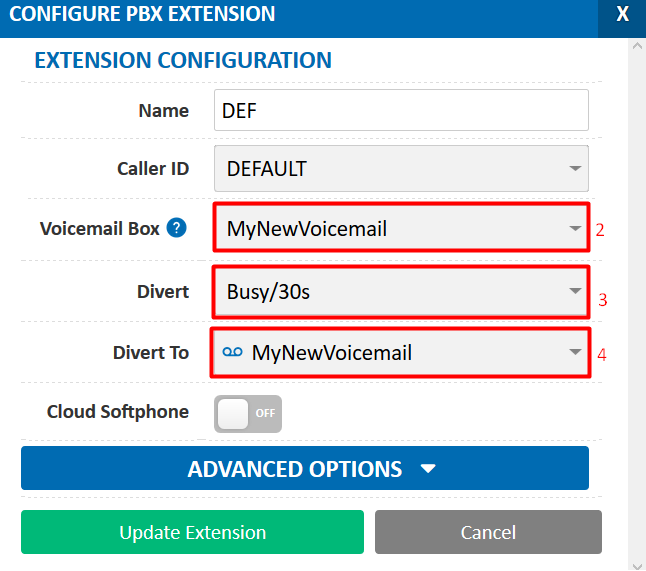
 Australian Sales team about our phone system plans?