

Using Custom Auto Provisioning Templates
Custom provisioning templates can be used to apply advanced configuration for auto provisioning compatible phones on our Hosted PBX platform.
Custom templates are an advanced option that uses raw device configuration. An incorrectly configured template may cause the device to disconnect from the network or the platform. If you don't have experience in applying configuration directly to devices we recommend using standard automatic provisioning.
For detail on setting up automatic provisioning and profiles, see Yealink Automatic Provisioning, Grandstream Automatic Setup & Provisioning or Using Hot Desking
Due to the wide range of configuration directives that can be applied and the differences in each deployment our team can only provide limited template support.
Creating a Template
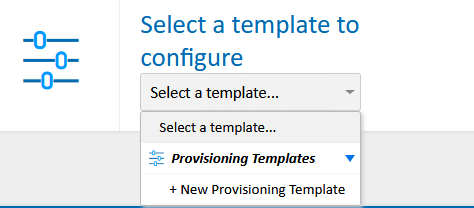
To create your template, login to https://my.maxo.com.au/ and select PBX Extensions
Towards the bottom of the page, locate the Select a Template to Configure option, then under select template choose New Provisioning Template
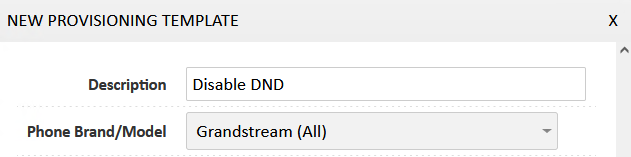
Provide a Description for your new template, along with the brand of phone you're configuring. Ensure this matches the device as they utilise different configuration formats.
In the Config section, enter your configuration lines:
Finally, specify if the template should be applied before or after the standard automatic provisioning configuration. In almost all cases this should be After.
Applying a Template To a Device or Profile
Teamplates can be added in two different places, depending on your requirements:
On a Device Basis: the template will apply to the device, regardless of who is logged in
On a Profile Basis: the template will apply to the specific hotdesk user and any phone they log in to. Do note that some settings are not removed from the handset when logging out, but can be overwritten when another user logs in to the specific handset.
Once a template has been assigned, you can sync the changes to the device by either:
- Rebooting the physical phone
- Hover over the phone in the Auto Provisioned Phones list and select either the Resync or Reboot and Resync that appear to the right of the MAC address.
- Using the bulk Reboot and Resync or Resync options to the right of the template manager. Note: this will reboot or resync all auto provisioned phones, not just those with a template applied.
Reverting Changes
To revert a change, you must first create a template to undo the previous changes.
For example, if you have disabled the DND function on a Grandstream (per the example above), create a template enabling the feature. eg.
<item name="call.dnd">
<part name="enable">Yes</part>
</item>
Once created, remove the original template and add the new undo template, then resync the phone using either the resync or reboot & resync option.
If The Handset is Offline
If a template setting has caused the handset to be unreachable or otherwise disconnected it from the provisioning platform, first remove the custom templates from the device. From the Actions menu at the top left of the profile or device editor, select Reset & Reconnect.
Factory reset the handset (hold the OK or speakerphone key on Yealink, or press the centre key > System > Factory Reset on Grandstream)
Once the reset is complete, the phone will check in and download the standard Automatic Provisioning configuration.
 Australian Sales team about our phone system plans?