

Portal Guide - IVR
An IVR (or Auto Attendant) is a menu callers can navigate with the phone keypad. These are commonly used for a main company phone number, to provide the caller with options to reach a specific department.
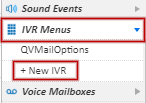
Adding an IVR
To create a new IVR, click the Add IVR button.

You can also select IVR > +New IVR in the destination list for DIDs, queues, etc.
For configuration options, please see the section below.
Managing Existing IVRs
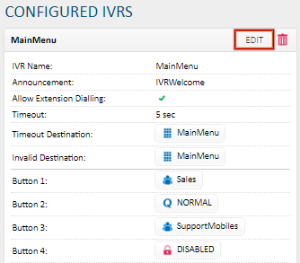
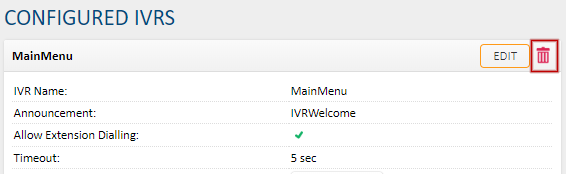
Any IVRs previously created are listed under Configured IVRs, and provides a quick view of the IVR's current configuration.
To edit an IVR, locate it in the list, then click the Edit button in the IVR's title bar.
IVR Configuration Options
The IVR configuration options and their descriptions are listed below. This example will create a 3 button IVR, with direct extension dialing enabled, which will route a call to a support queue if no button is pressed, or repeat the IVR menu if an invalid button is pressed.
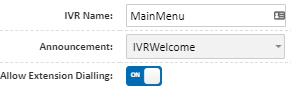
Provide an IVR Name for this IVR. This will be shown in the IVR overview and the list of destination options on number routing, time switches, etc.
In the announcement field, select the sound file to be played on the menu. This should contain the list of options (eg. "Thanks for calling Company, press 1 for sales, 2 for support, or 3 for our field technicians"), You can also use the +New Sound (record) or +New sound (upload) to add a new sound file for this IVR. For more information on sounds, see Portal Guide - Sounds and Sound Events
If desired, enable Allow Extension Dialling. This will allow callers to directly enter an internal extension number (for example 105) and have their call routed directly to that extension.
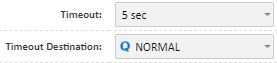
Select the Timeout value. This specifies the amount of time the system will wait for a button input before sending the caller to the Timeout Destination.
Timeout Destination specifies where a caller should be routed if they don't press a key within the number of seconds specified in the Timeout field. For this example, we're sending them to the normal support queue after 5 seconds without a key press.
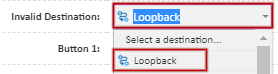
Set the Invalid destination to the place a call should be sent if they press a 'disabled' button. For this example, we want it to repeat the IVR greeting, so it is set to Loopback
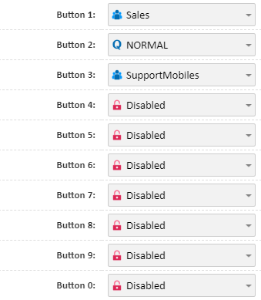
Each X Button field corresponds to a number on the caller's keypad. For example, button 1 would be the caller pressing one on their phone.
For each number that will be used, select the dropdown to the appropriate destination for that option. If a caller presses any keys that are marked disabled, they will be directed to the Invalid Destination.
In this example, buttons 1, 2 and 3 are configured. Button 1 directs to a sales ring group, button 2 to a support queue, and button 3 to a ring group of external numbers.
Once all destinations are selected, click Save. You can now route to this IVR by selecting IVRs in the destination field of a phone number, time switch, queue, etc.
Removing an IVR
To delete an IVR that's no longer in use, locate it in Configured IVRs, then click the remove button in the title.
Note that this action can't be undone, and to reinstate the IVR it will need to be recreated.
 Australian Sales team about our phone system plans?